

When you compile a Scrivener project, you stitch together all its texts to export a single file. It’s easy to compile for print, PDF, or Microsoft Word format to share your manuscript with others.
When you compile a Scrivener project, you stitch together all its texts to export a single file. It’s easy to compile for print, PDF, or Microsoft Word format to share your manuscript with others.
When working in Scrivener, you plan, write, rearrange sections and chapters, and piece together your manuscript. At some point, you will want to export it to send to a critique partner, agent, or editor, or as an ebook if you self-publish. In Scrivener, this process is called compiling.
When Scrivener compiles a project, it stitches together its various elements, recognizing the structure of folders and files to create the sections and chapters of a final manuscript. You can tweak the Compile interface in many ways, but most people never need to go beyond the basics.
In this article, we look at compiling a Scrivener project for print, PDF, and Microsoft Word .docx formats. In a previous article, we looked at compiling Scrivener projects for ebooks that you can use if you self-publish.
What is compiling?
Scrivener projects are made up of a number of folders and files, and the app needs to combine them to export your project to a single file. No matter how complex your Binder – whether you use only files for chapters, or have folders and sub-folders with multiple scene files for each chapter – the manuscript is still linear. It starts at the top of the Binder and proceeds to the last file in the Draft or Manuscript folder.
Compiling connects all these files, recognizing divisions such as parts and chapters and the files they contain. It also applies styles to them, regardless of how the files are formatted within Scrivener.
As you’ll see below, the Compile screen has many options, but most users don’t need to go beyond a few basic settings.
Default template compile settings
Scrivener templates contain specific compile settings for the type of document they are designed to produce. While you can use the Blank template to create any project, using a specific template – such as Novel, Novel with Parts, or General Non-Fiction – can make compiling simpler.
In Different Ways of Setting Up Scrivener’s Binder for Your Projects, we discuss various ways of setting up the Binder for your project, and the first three examples are the most practical for most uses. From left to right, these show the Novel template, the Novel with Parts template, and the Blank template when first created.
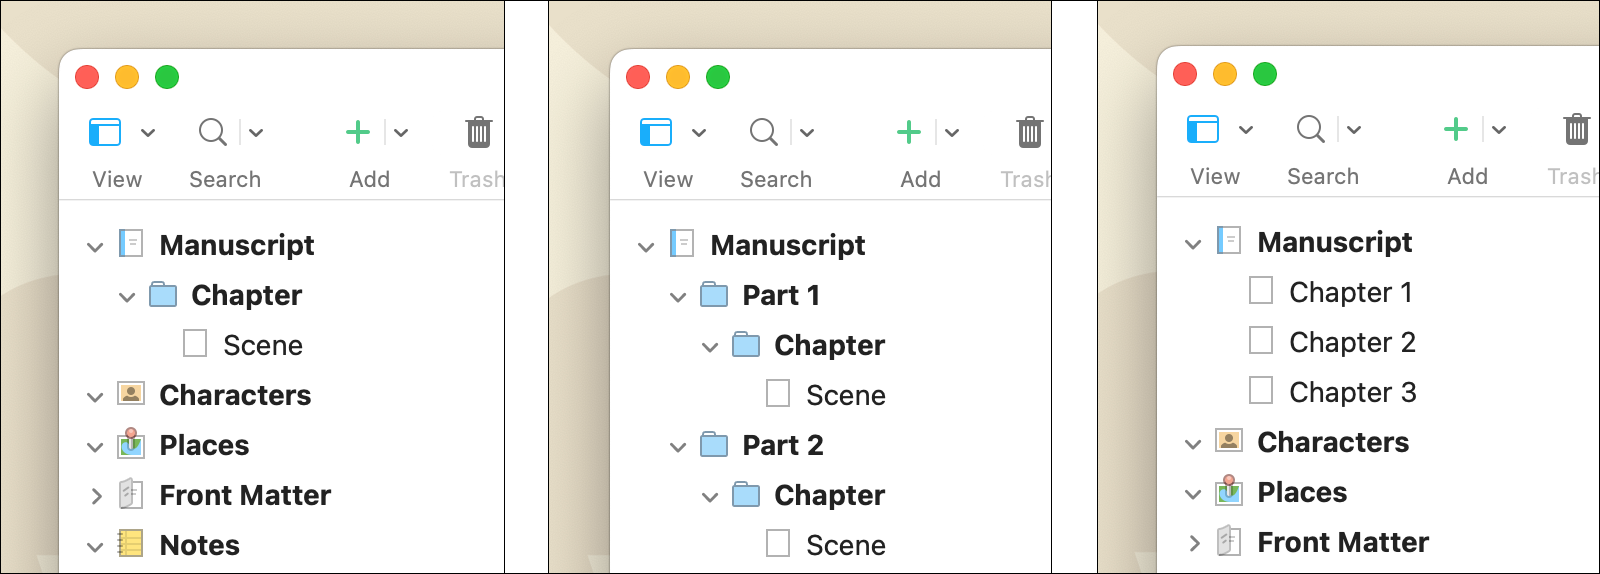
The first two projects contain compile settings adapted to that project; the Blank project does not have any specific settings.
The Compile Overview screen
Let’s look at the basics of compiling a Scrivener project. I’ll use the Novel, Novel with Parts, and General Non-Fiction templates as examples to show how the process works and how the default settings differ between the two projects.
To start with, choose File > Compile. This opens the Compile Overview screen.
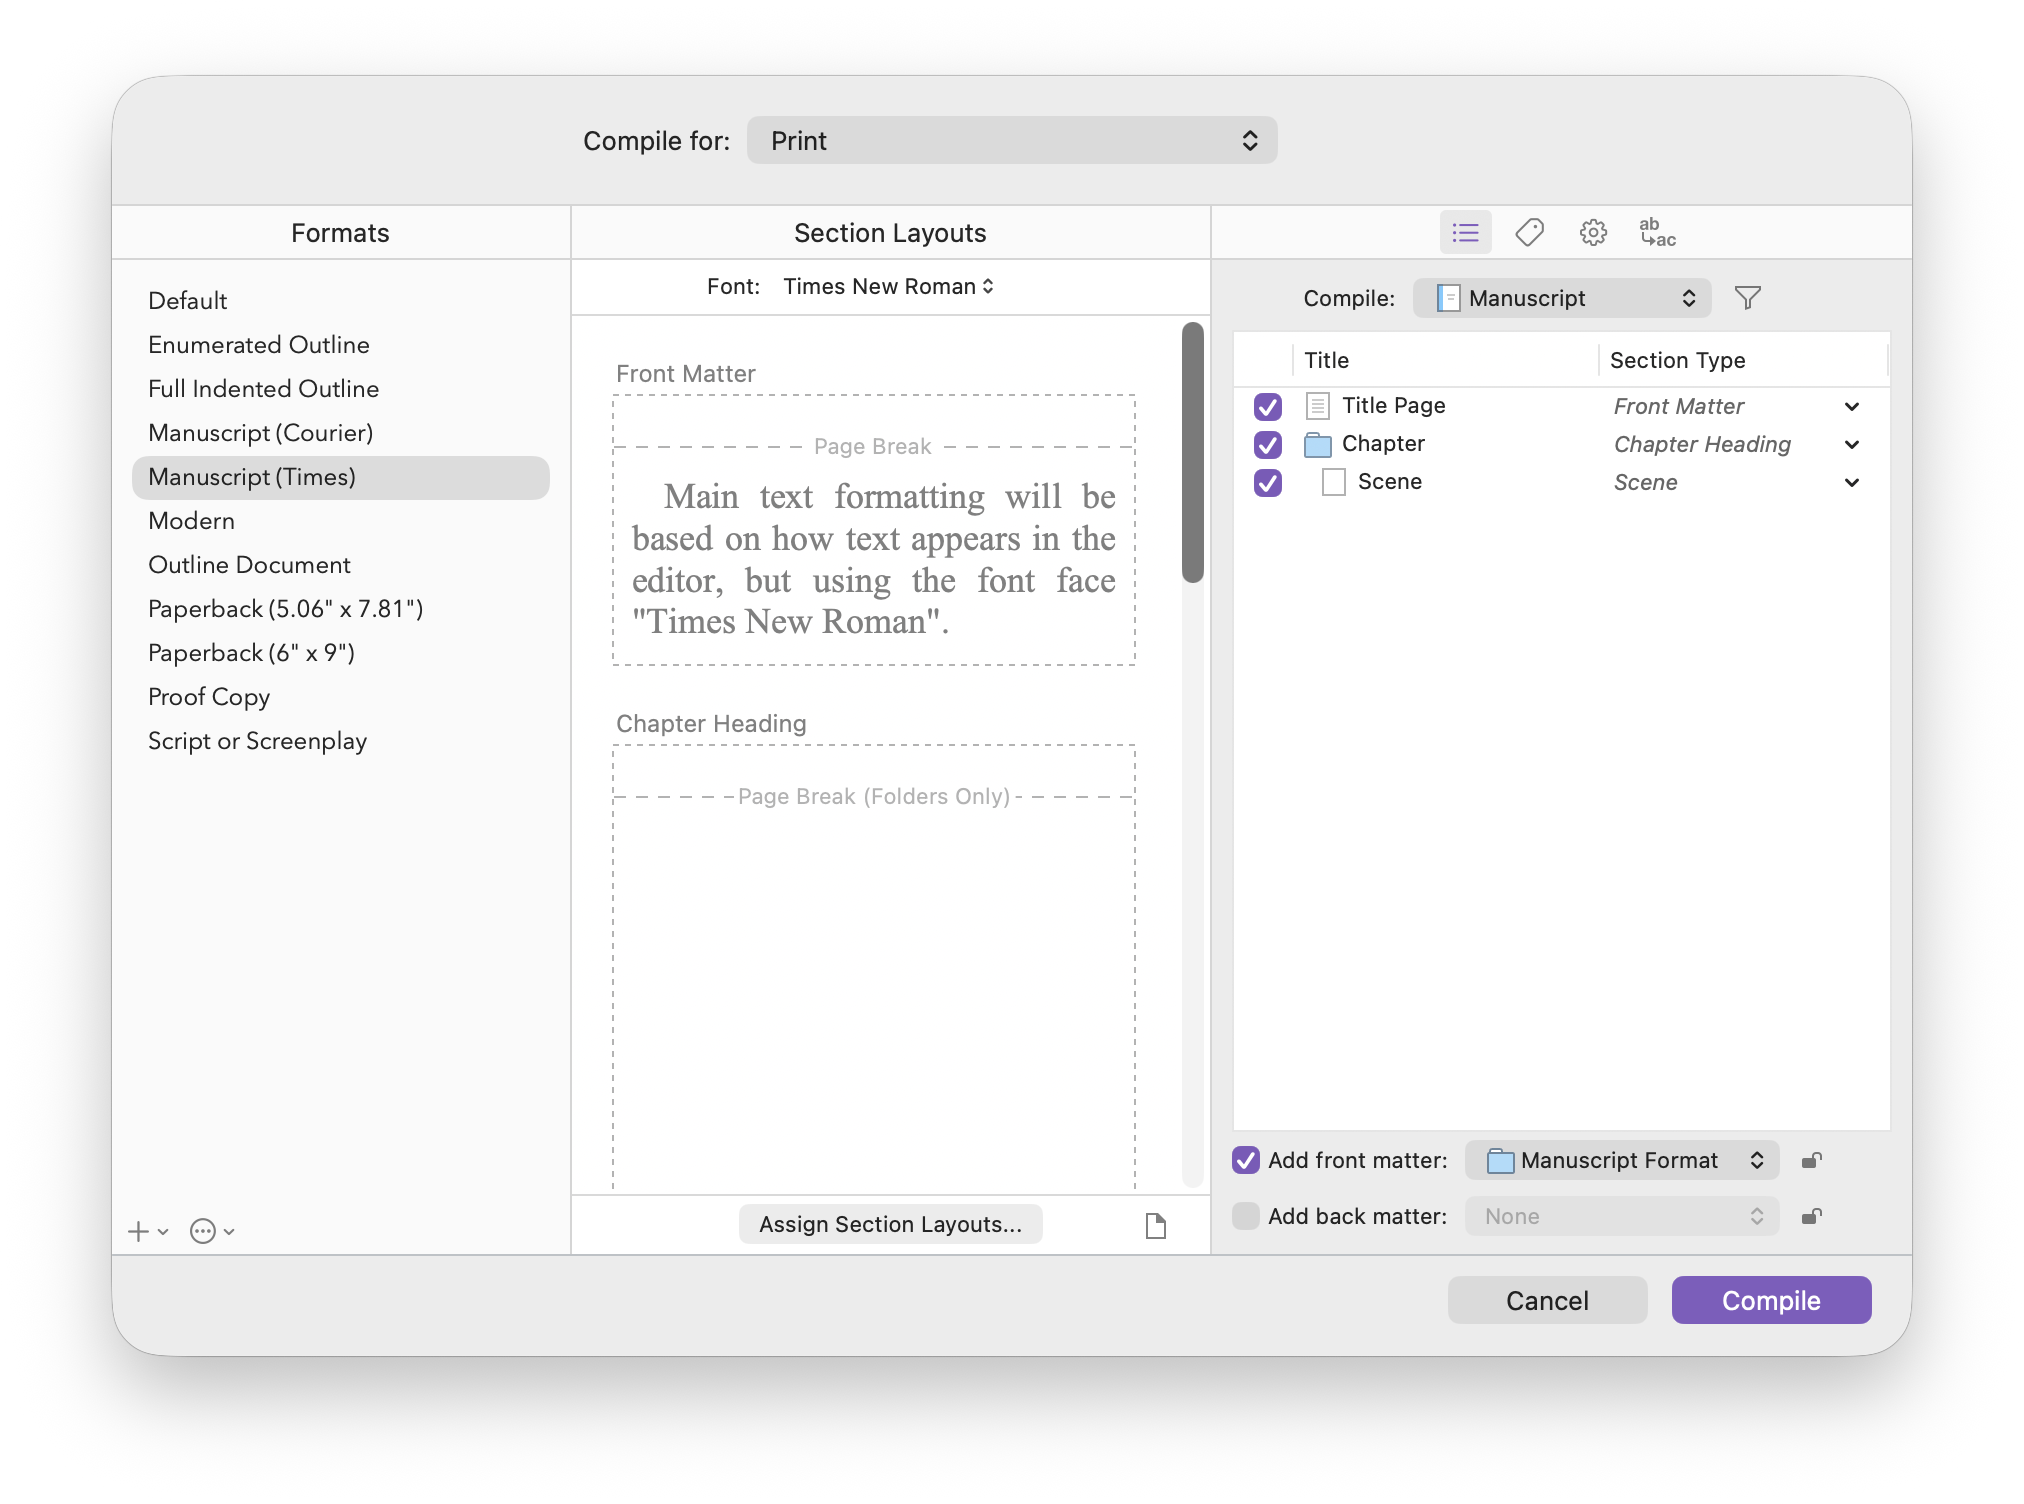
There are three columns on this screen, displayed above using the Novel template:
- Formats: This is a list of preset format options; different project templates provide different options.
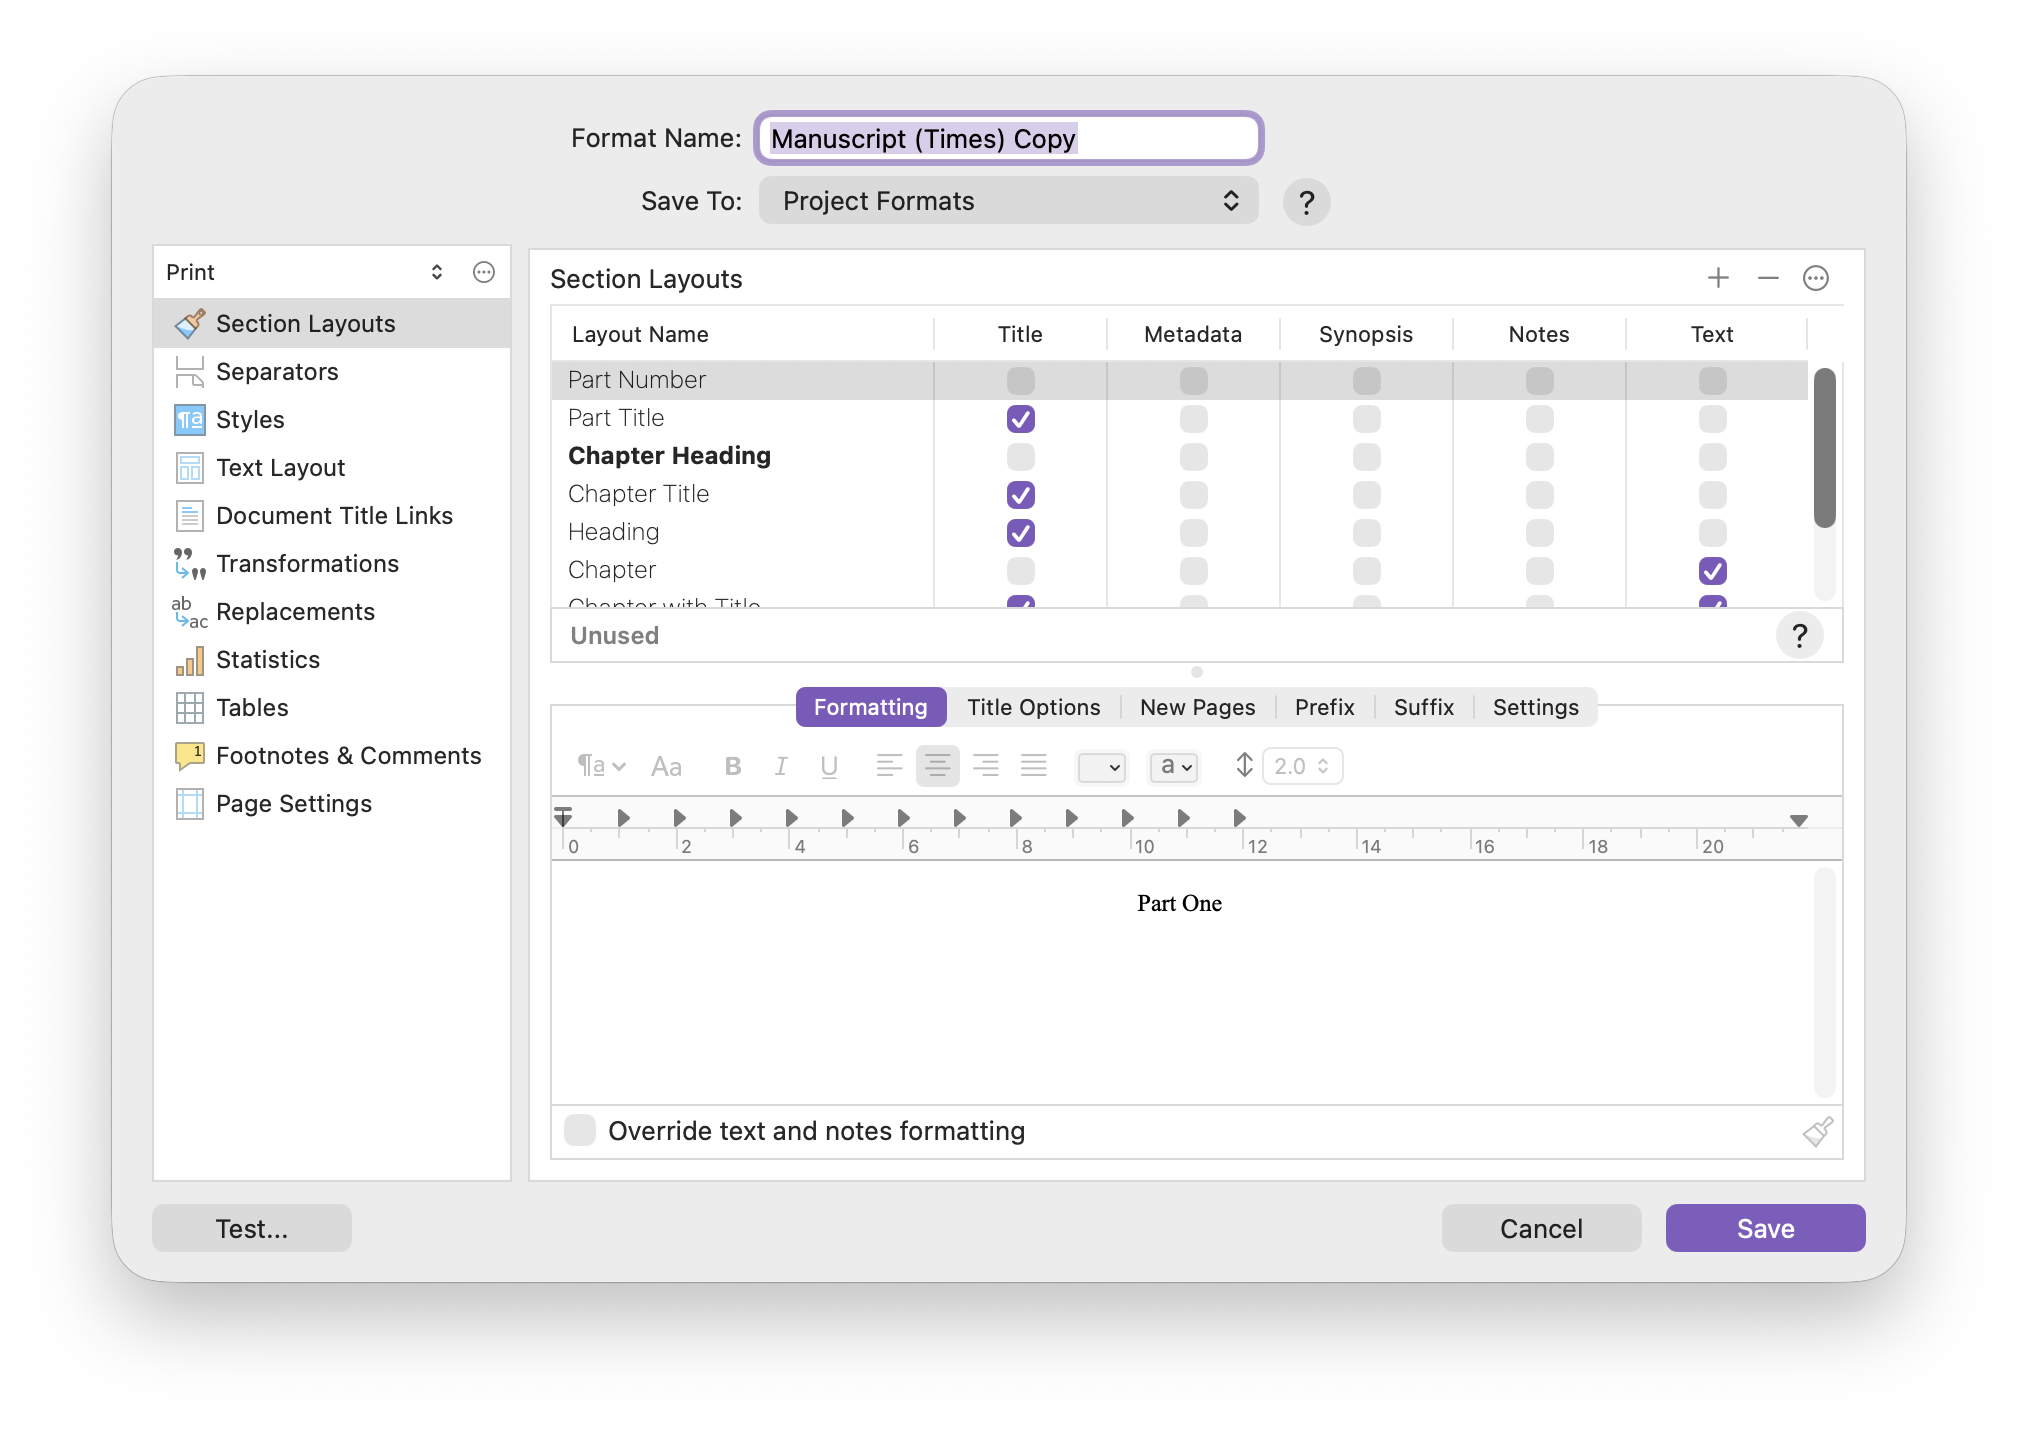
- Section Layouts: This section is where you apply styles to different section types, such as chapter headings or scenes, to tell Scrivener how you want them to look in the exported document.
- Compile Options: This column offers a number of options, such as choosing the section type for different elements, including or excluding folders or files, and more. Scrivener has applied default section types to Front Matter, Chapter Heading, and Scene in this column; you can tell that these are the defaults because they are in italics. If you choose a specific section type, they won’t be in italics.
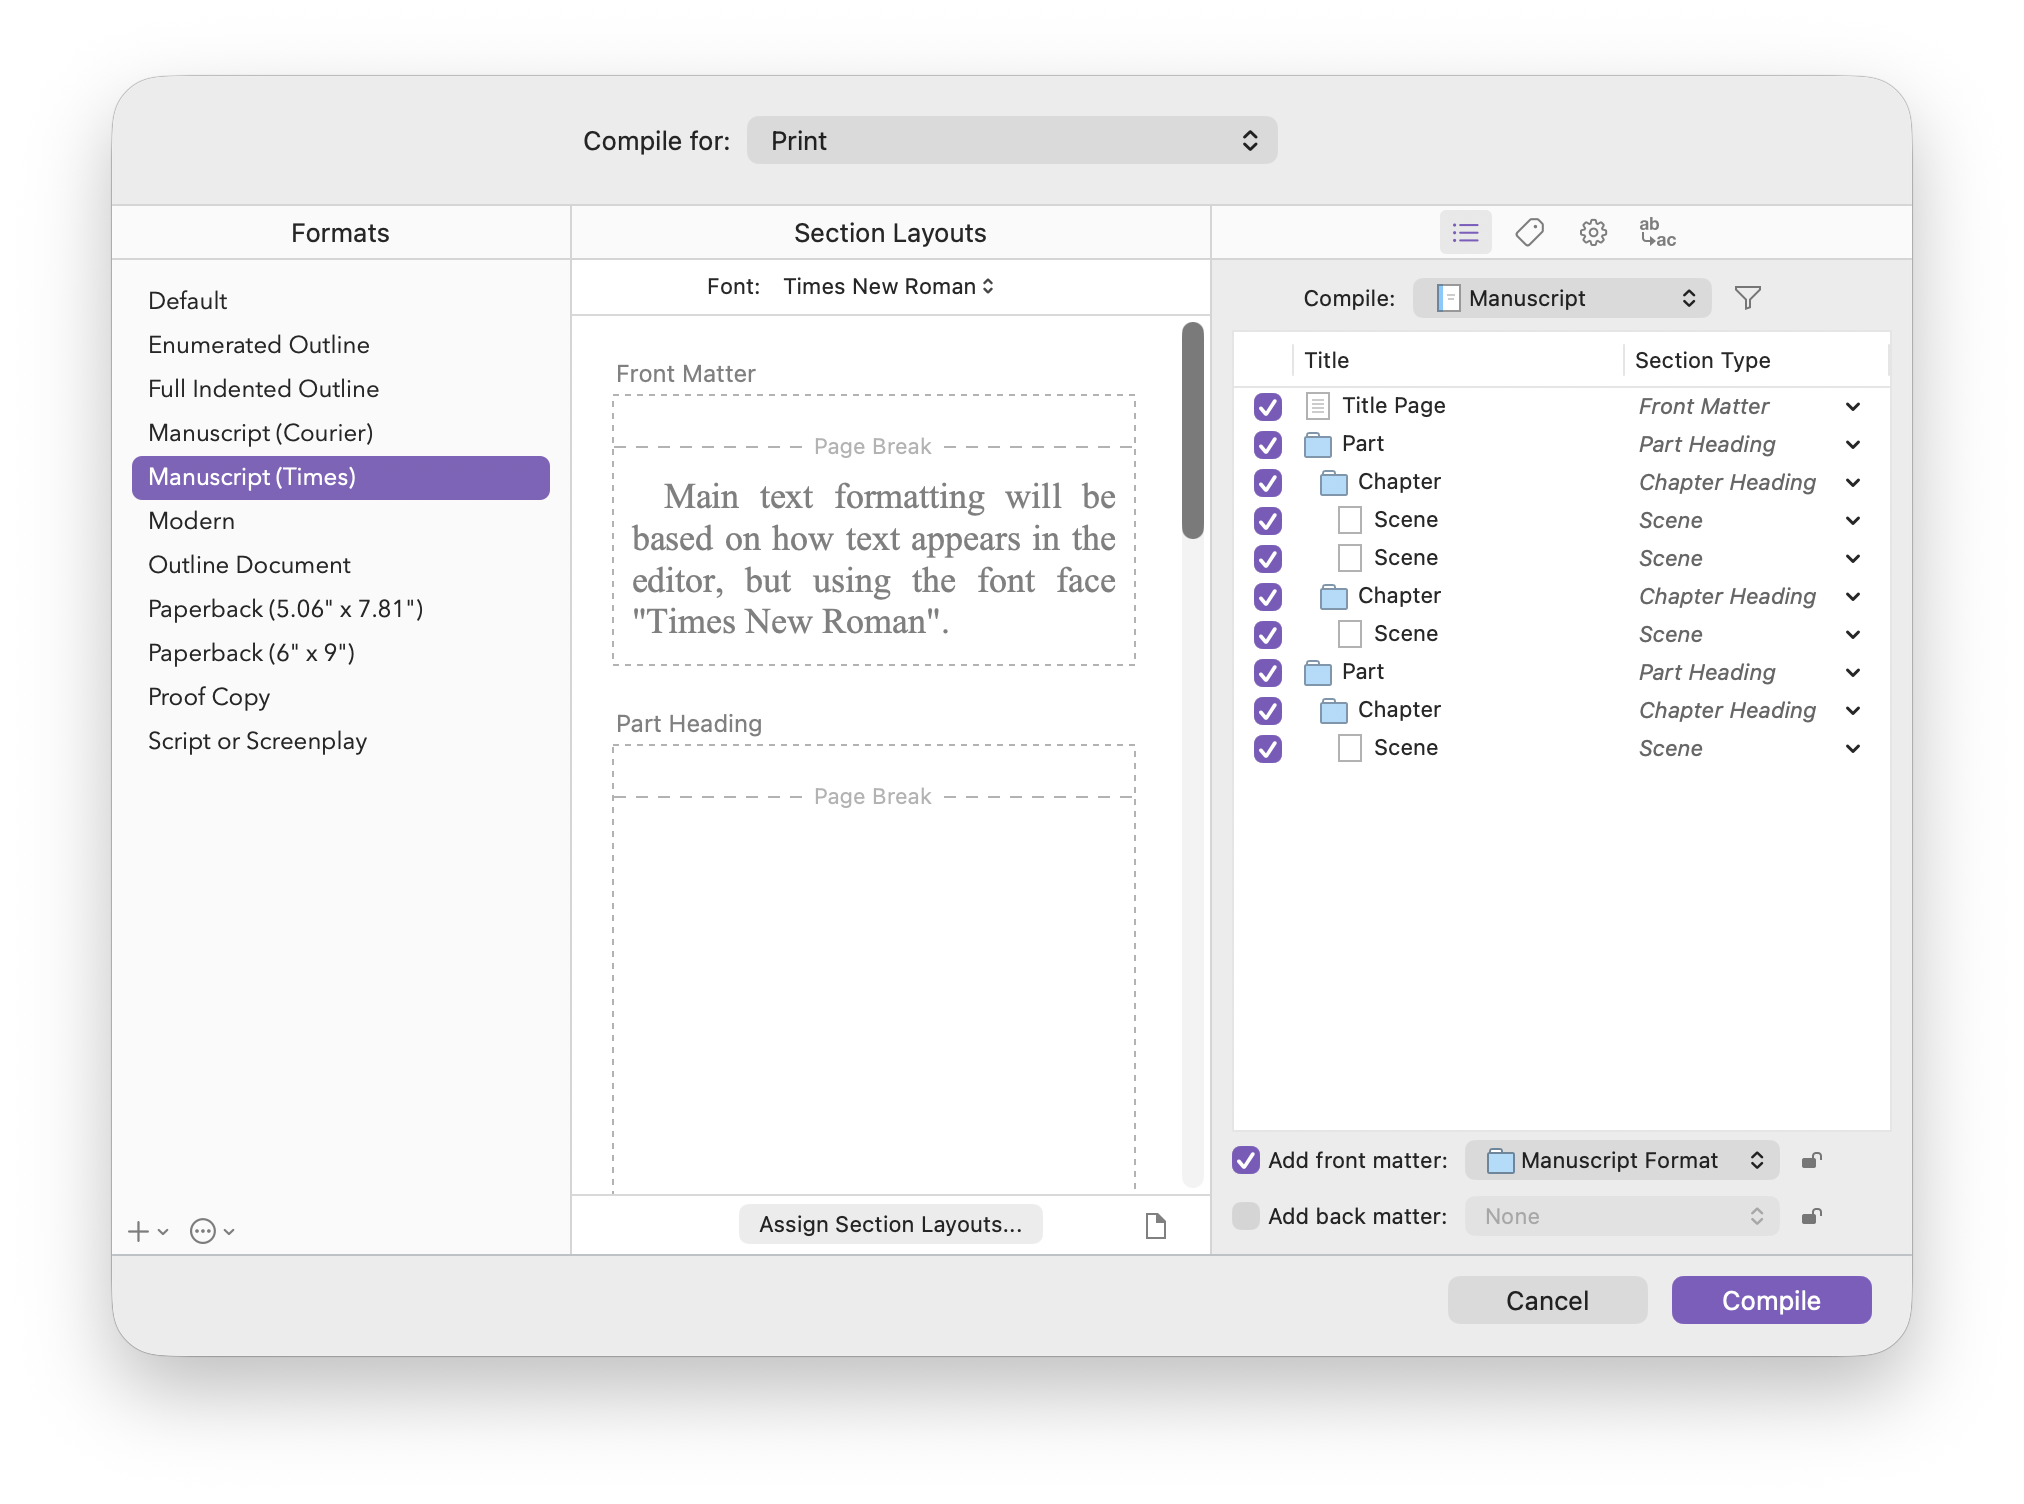
Projects created from different templates provide different options in the Compile Options column. Here’s the Compile Overview screen for the Novel in Parts template; it adds a Part Heading section type in the Compile Options column:
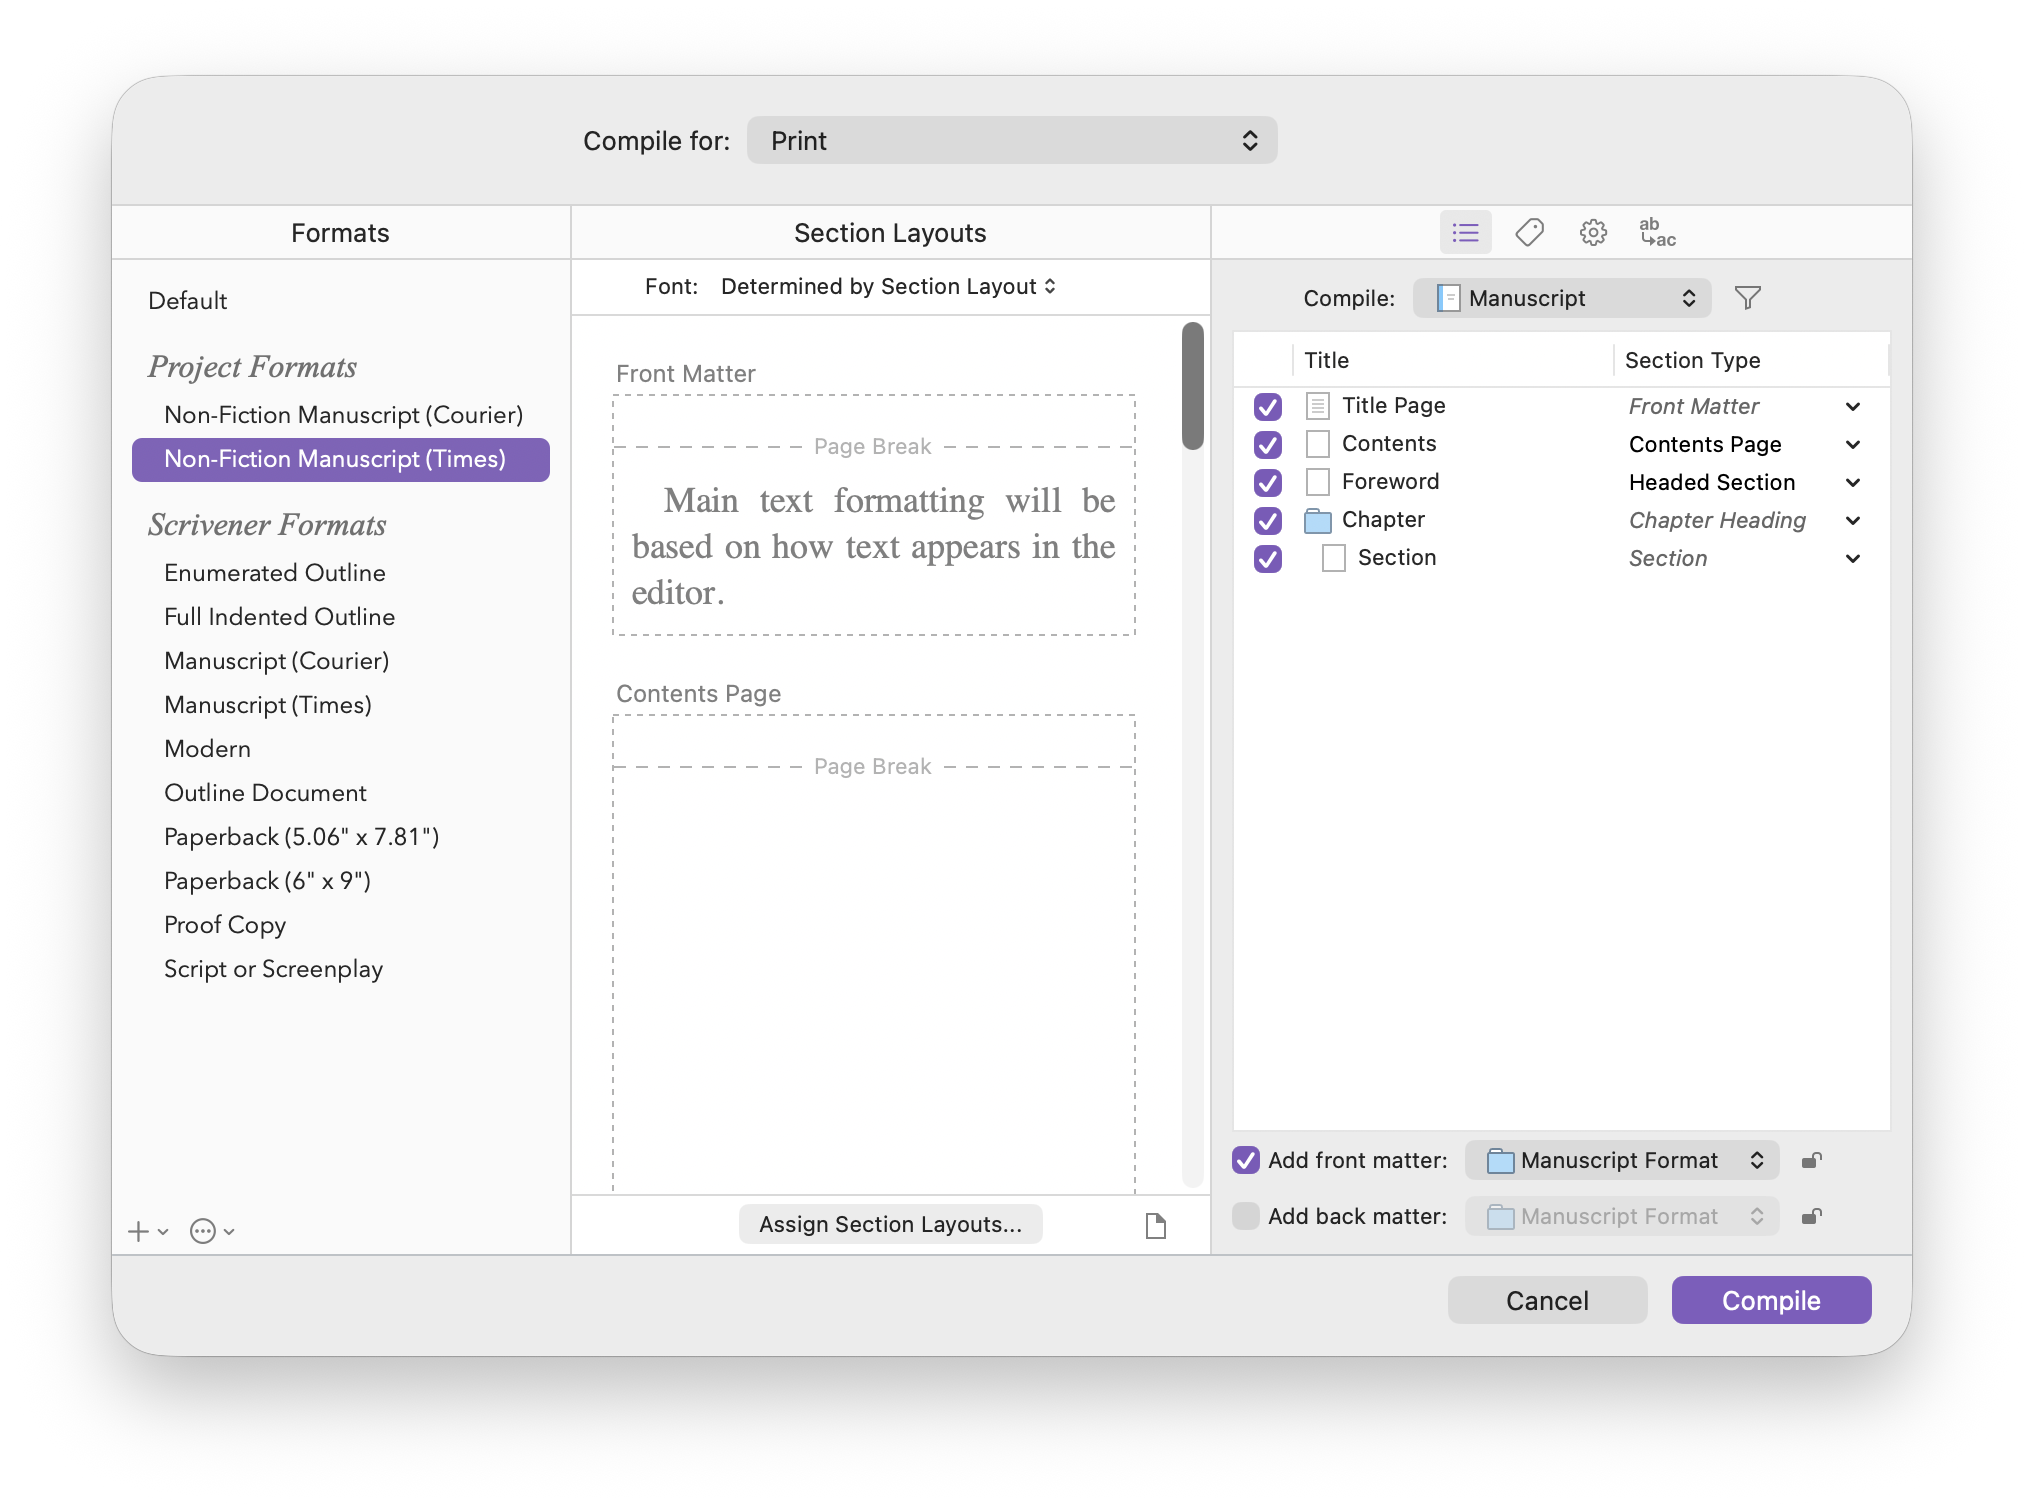
And the General Non-Fiction template includes a Contents page, a Foreword, and Sections instead of Scenes:
Compile Formats
The left column of the Compile Overview screen lists a number of formats. These include outlines, Manuscript formats designed for standard publishing conventions, different-sized paperback pages, and more. In most cases, you’ll use one of these formats, but you can tweak these or create your own compile formats.
If you’re compiling your project to send to a critique partner, agent, or publisher, choose one of the two Manuscript formats. They use standard publishing conventions and only differ by the font they use: the first uses Courier, a monospace font, and the second uses Times Roman, a variable-width or proportional font.
If you want to go further, you can click the + button at the bottom of the column and choose New Format to roll your own, or Duplicate & Edit Format to tweak an existing format. This gives you many advanced options for how your project compiles:
Using the Duplicate & Edit option is ideal if you want to make minor changes to a format, while creating a new format means you have to set up everything from scratch.
Chapter 24 of the Scrivener manual goes into detail about these options.
Setting up section layouts
The center section of the Compile Overview screen is where you tell Scrivener how you want your compiled document to look. In many cases, this will be determined by the compile format you selected in the left column. The Manuscript formats, for example, are designed to conform to publishing industry standards with 12-point, double-spaced fonts. If you’re compiling your manuscript to send to an agent or editor, it’s best to choose one of these formats.
If, however, you want to customize the way your compiled document looks – choosing your own font, spacing, alignment, etc. – then you can create your own section layouts and assign them to specific section types.
Sections in Scrivener are such elements as Part Heading, Chapter Heading, Scene, Chapter, and so on. Think of them as the constituent elements of a book or document; defining styles for each element results in coherent output. You generally want all your chapter titles in the same font, size, alignment, and weight, and you only need to assign styles once to each section type. This is similar to using styles in a word processor.
Note that these section layouts override any formatting you have made to your text within Scrivener. This means that you can use very different formatting while you’re writing, revising, and editing from what you eventually export. You can, however, use the As-Is section type if you want to retain your formatting as it displays in Scrivener.
For more on section types and section layouts, see Using Section Layouts to Compile Your Scrivener Project.
Choosing what to include in your compiled document
Scrivener’s Binder contains many folders and files. The topmost folder, named Draft or Manuscript depending on the template, contains the text of your project in folders and files. The other folders in the Binder, such as Characters, Places, Research, etc., are not meant to be compiled and don’t display in the Compile Options column. Compiling only includes items in your top-level folder.
By default, the Compile Overview screen shows every item in the top-level folder of your Binder as selected. In most cases, this is ideal: you want Scrivener to compile every item that you have written.
But you may not always want to do this. You may want to compile the first few chapters of your manuscript, for example, to send to an agent. In that case, uncheck the items that you don’t want Scrivener to include in the compiled document.
You can also limit the scope of Scrivener’s compile by clicking the menu at the top of the Compile Options column and choosing any folder in your project.
And it is here that you can choose to include front and/or back matter in your compiled document. See How to Use Front and Back Matter when You Compile Your Scrivener Projects for more on this, and see chapter 23.4 of the Scrivener manual for more on the options in this column.
Compiling for print, PDF, or Microsoft Word
At the top of the Compile Overview screen is a menu labeled Compile for. Click this menu to see the file types that Scrivener can compile.
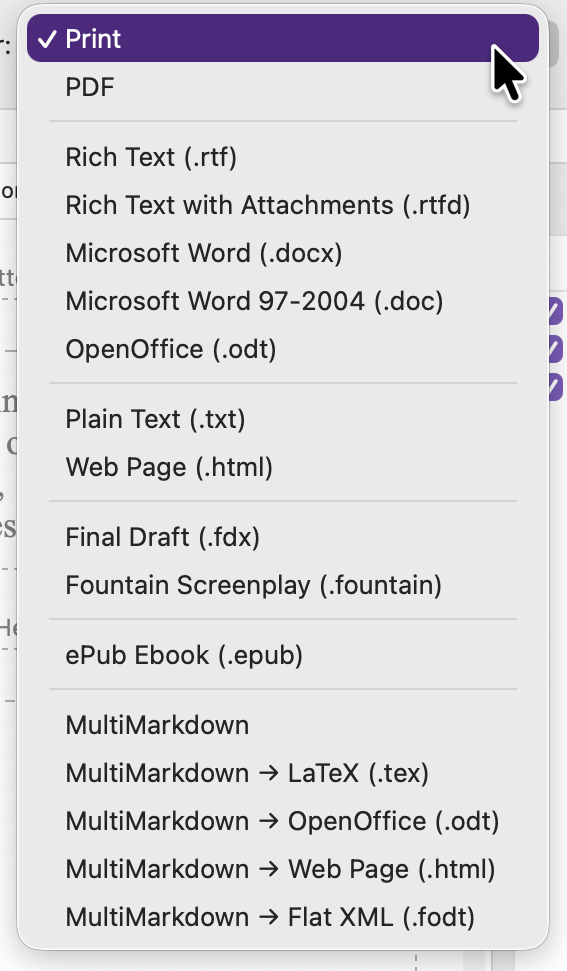
In most cases, you’ll be compiling to PDF or .docx, or perhaps for Print, which compiles your project and sends it to your printer. If you want to print your document, it’s probably better to compile to PDF, check the document, and then print it. If there’s anything wrong with the layout and you send it to your printer right away, you may waste paper and ink.
Choose your format from this menu. Scrivener asks you to name the file it exports, then it creates the file. In the Save dialog, there is an option to have Scrivener open the compiled document after saving; if you have more than one app on your computer that can open that type of file, you can choose which app the file opens in.
After you’ve compiled the project, you can open the file and view it to check that everything is as it should be and, if not, go back to Scrivener and make changes. With editable formats, such as .docx or .rtf, you can make changes in the compiled document, but that’s not easy to do with a PDF file, unless you have special PDF editing software.
Compiling Scrivener projects looks daunting, but for most use cases, it is quite simple. As this article shows, it takes just a few clicks to export your project as a PDF or Microsoft Word document. If you’re self-publishing, the process has more options; a forthcoming article explains how to compile a Scrivener project as an ebook.
Kirk McElhearn is a writer, podcaster, and photographer. He is the author of Take Control of Scrivener, and host of the podcast Write Now with Scrivener. He also offers one-to-one Scrivener coaching.